
Cabinet Painting Before & After: What a Professional Refinish Can Change
Kitchen cabinets cover more wall than almost anything else in the room, so changing their color changes how the whole kitchen reads, even though the layout, countertops and appliances stay exactly where they are. That’s why a cabinet painting before and after can look like a remodel. It isn’t one, and knowing where that line falls makes it much easier to decide whether painting is the right move for your kitchen.
Professional cabinet painting changes the color, brightness and overall style of a kitchen. It doesn’t change the cabinet layout, door style, storage or damaged cabinet boxes. Most of the quality difference happens during prep, before any paint goes on.
Why Painted Cabinets Change How a Kitchen Feels
In most kitchens the cabinets are the largest continuous color in the room. Upper and lower runs wrap the walls, and an island adds a block of color in the middle. When those surfaces go from a dated orange-toned wood to a soft white, greige or deep blue-green, the countertops, backsplash and floor are suddenly seen against a different backdrop. The same materials can start to look intentional instead of left over from another decade.
That’s also the limit of what paint does. It changes the surface. Everything about the structure underneath (where the cabinets are, how the doors are built, what’s inside them) stays the same. The four stages below show how a professional refinish gets from one to the other, and what to look at along the way.
The Four Stages of a Cabinet Painting Before & After
The illustration below walks through the four stages of a typical painted cabinet refinish, from original stained cabinets to a finished painted kitchen.
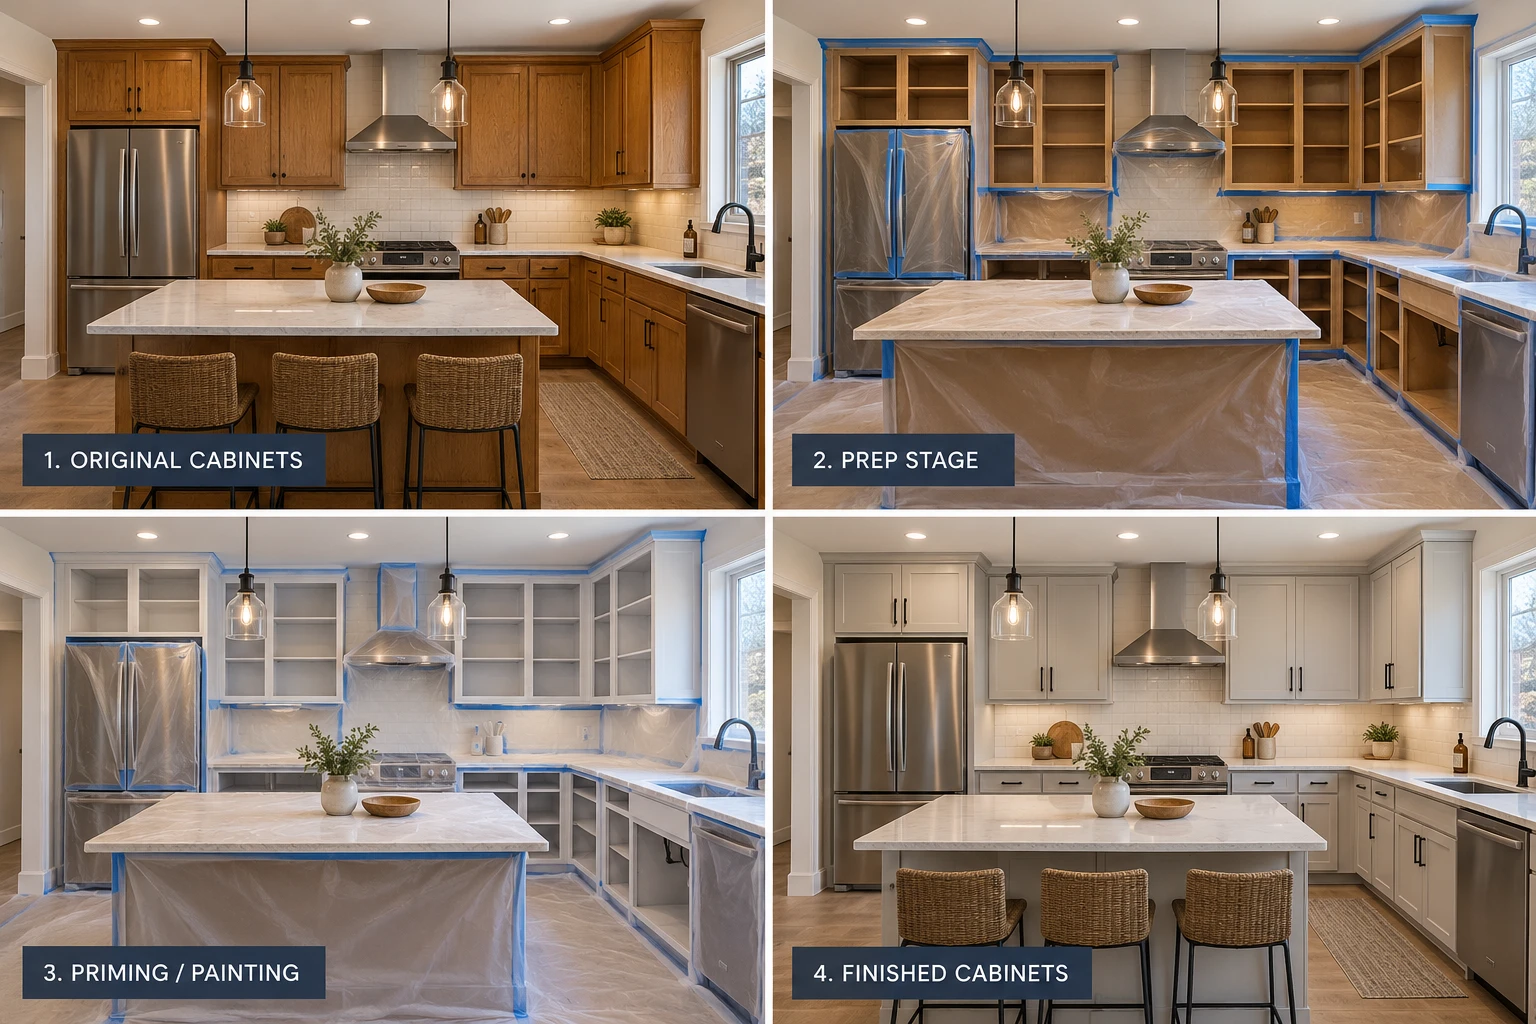
1. Original Cabinets: What to Evaluate First
Before choosing a color, look closely at what you’re painting. Painting is a good fit when the cabinets themselves are solid and only their finish is tired. Check:
- Cabinet boxes. They should be firm and square, with no swollen particleboard under the sink or beside the dishwasher.
- Doors and drawer fronts. Flat, not warped or delaminating, with hinges and slides that still work properly.
- The existing finish. Stained wood, an older painted finish and laminate or thermofoil each need a different prep and primer approach.
- Grease and residue. Cooking grease builds up near the range and around handles, and it has to come off completely.
- Damage. Dents, chips, water marks and loose edges need repair before any coating goes on.
- The door style. Paint changes color, not shape, so you should still like the door profile you have.
2. Prep Stage: Where Most of the Quality Difference Happens
In the prep stage of the illustration, the doors are off, the cabinet interiors are exposed and everything around the cabinets is covered. That stage is where a professional refinish separates itself from paint brushed over the old finish.
Doors and drawer fronts are usually removed and labeled, so they can be prepped and finished laid flat and go back exactly where they came from. Every surface is cleaned and degreased, because paint doesn’t bond to grease. Glossy finishes are scuff-sanded or deglossed so primer has something to grip, minor dents and chips are filled and sanded smooth where appropriate, and countertops, backsplash, floors, appliances and walls are masked off.
Painting straight over dirty or glossy cabinets is faster. It’s also a common reason a cabinet paint job starts peeling early, especially around handles and the sink, where hands and water hit the finish every day.
3. Priming / Painting: Building Adhesion
Primer does the bonding the finish coat can’t do on its own. Which primer is used depends on what’s underneath: bonding primers suit slick or previously finished surfaces, and stain-blocking primers are used where tannins in woods like oak, or a dark stain going light, could bleed through a pale color.
Oak’s open grain will still show through paint unless it’s filled first. Some people like that texture and some don’t, so it’s worth deciding before the work starts. Between coats, surfaces are lightly sanded where needed to knock down raised grain and dust, which is a big part of why a finished door feels smooth instead of gritty.
4. Finished Cabinets: The Finish Coats
The final coats carry the look and most of the durability, and cabinets need a harder, more washable coating than wall paint. Arvada PaintWorks uses Sherwin-Williams Emerald Urethane Trim Enamel where it suits the job, a professional enamel made for cabinets, doors and trim.
Doors and drawer fronts are sprayed where practical to produce a smooth, consistent finish. Cabinet frames and other fixed surfaces are finished using the application method appropriate for the specific kitchen and coating system. Once the hardware is back on and the doors are rehung and adjusted, the coating keeps hardening for a while after it feels dry, so the first few weeks call for a little extra care.
What Cabinet Painting Can Change
Done well, painting changes more than the color:
- Color. Orange or yellow wood tones can become whites, greiges, blues, greens or a two-tone combination.
- Brightness. Lighter cabinets reflect more light and can make a darker kitchen feel more open.
- Overall style. The same cabinets can read as modern, transitional or farmhouse depending on color and hardware.
- Consistency. Mismatched, patched or unevenly faded finishes become one uniform surface.
- Dated wood tones. The look of honey oak and similar finishes is replaced with a deliberate color choice.
Give the color choice extra time. Cabinets are seen in daylight, under overhead lights and under warm evening bulbs, and a white or gray that looks crisp at noon can read warmer or duller at night. Sampling a color on a real door in your own kitchen is the most reliable test.
What Cabinet Painting Doesn’t Change
Paint is a surface treatment. On its own, it doesn’t change:
- The cabinet layout, or where anything is installed.
- The door style or profile. A raised-panel door stays a raised-panel door.
- Storage, shelving or how the drawers work.
- Cabinet boxes that are swollen, cracked or water-damaged.
- The countertop or backsplash.
- The hardware, unless you replace it separately.
Hardware is the easiest of these to change at the same time. Pulls and knobs come off for painting anyway, and if new hardware uses a different hole spacing, the old holes can be filled before painting. But if the layout doesn’t work for how you cook, you dislike the door style or the boxes are failing, painting won’t fix the real problem, and replacement or other cabinet work is usually the better investment.
Painting vs. Replacing: A Practical Way to Decide
There isn’t a universal answer, but a few questions usually settle it. Painting tends to make sense when most of these are true for your kitchen. Your answers are saved if you come back to this page.
Progress
0 of 6 complete
If several of those come back no, replacement or a larger remodel is probably the better use of your budget. If most come back yes, painting changes the look of the kitchen while keeping cabinets that still work, and it’s typically far less disruptive than tearing everything out.
How Long Does a Painted Cabinet Finish Last?
It depends far more on the work and the household than on any single product. The things that make the difference:
- Preparation. Cleaning, degreasing, sanding and priming decide how well everything above them holds on.
- The coating system. A primer and enamel suited to cabinets, applied at the right thickness.
- Cabinet condition. Solid, stable cabinets hold a finish better than ones that flex or have been water-damaged.
- Household use. Busy kitchens see more wear on handles, edges and lower drawers.
- Cleaning. Mild cleaners and soft cloths are kinder to the finish than abrasive pads.
- Moisture and heat. Areas around the sink, dishwasher and range take the most stress.
No painted finish is indestructible. Edges and high-touch spots may eventually need touch-ups, which is easier if you keep a little of the same paint. Our cabinet work carries the same 2-year workmanship warranty as the rest of our painting.
If you’re in Arvada or a nearby city and your cabinets sound like good candidates, our cabinet painting and refinishing service page explains how we approach a kitchen, and a free estimate starts with a look at your cabinets in person.
Frequently Asked Questions
Can old kitchen cabinets be painted?
Usually, if the cabinet boxes are solid and the doors are in good shape. Solid wood and MDF take paint well with the right prep and primer. Swollen particleboard, failing laminate and peeling thermofoil are the common exceptions.
Will wood grain show through painted cabinets?
On open-grain woods like oak, usually yes, unless the grain is filled before priming. Closed-grain woods like maple, and MDF doors, give a smoother painted surface.
Can you change the cabinet hardware at the same time?
Yes. Hardware comes off for painting anyway, so it’s a good time to switch. If new pulls use a different hole spacing, the old holes can be filled before the cabinets are painted.
Is painting cabinets worth it before selling a house?
It can help a dated kitchen show and photograph better, but whether it’s worth it depends on the cabinets’ condition and your timeline. Our article on painting before you sell covers which projects tend to matter most.
Keep Reading
Related Articles
Should You Paint Your House Before Selling?
Which rooms and surfaces actually move the needle with Denver metro buyers.
Read articleHow to Choose a Painting Contractor in Arvada
The questions to ask about licensing, insurance and surface prep before you hire, and the red flags to walk away from.
Read articleThinking About Painting Your Cabinets?
Get a free estimate, and an honest answer on whether painting is the right fit for your kitchen.